A tailgate trim piece can make or break the rear view of an El Camino. When it is dented, pitted, loose, or simply missing, the whole truck-car looks unfinished. That is why el camino tailgate trim replacement is not just a cosmetic fix. It is one of those detail jobs that brings the body lines back together and makes the restoration feel right.
On a 1964-72 El Camino, rear trim fit matters more than many owners expect. The tailgate sits in a high-visibility spot, and any mismatch in length, contour, finish, or mounting points stands out fast. If you are aiming for a factory-correct restoration, or even just a clean driver-quality refresh, it pays to slow down and choose the right trim before you start drilling, tightening, or snapping anything into place.
What matters in el camino tailgate trim replacement
The first step is identifying exactly what your El Camino needs. That sounds obvious, but tailgate trim work often gets complicated by year differences, model variations, and previous repairs. A car that has changed hands a few times may already have a swapped tailgate, aftermarket trim, non-original fasteners, or filled mounting holes from an older repair.
That is why fitment should come before finish. Bright polished trim may look great in a catalog photo, but if the profile is wrong for your year or the mounting pattern does not match the panel, you are creating extra work. For many owners, the best route is confirming the tailgate itself is correct for the vehicle, then matching the trim to that panel rather than assuming the current setup is original.
Condition matters too. If your original trim is only lightly scratched, restoration may be worth considering. If it is bent, deeply pitted, or cracked around the mounting points, replacement is usually the smarter move. Trim that looks salvageable on the bench can become a headache once you try to align it on the vehicle.
Reproduction, NOS, or used – which one makes sense?
This is where the right choice depends on your goals.
If you are building a show-level El Camino and chasing original assembly-line appearance, NOS or high-quality original used trim may be the better fit when available. The benefit is authenticity. The trade-off is cost, limited availability, and the reality that even genuine older parts can carry shelf wear, age spotting, or minor imperfections.
For many restorers, reproduction trim is the practical answer. A quality reproduction part can give you the clean look you want without the time and uncertainty of restoring damaged original pieces. The key is buying from a supplier that understands GM A-body applications well enough to help you sort out year-specific details, hardware needs, and fitment concerns before the order ships.
Used trim has its place, especially when a specific version is hard to source. But used parts are always a balance. You may get original fit and stamping, but you may also inherit hidden damage, prior polishing, stretched mounting holes, or thin spots in the finish. If you go that route, ask hard questions about straightness, pitting, and mounting condition.
Year and fitment details to verify first
Before ordering any part for el camino tailgate trim replacement, verify the model year, tailgate style, and whether your vehicle has had body panel changes over the years. That matters because restorations done decades ago often mixed parts from donor vehicles without much documentation.
Check the trim length against the tailgate width, inspect where the mounting points sit, and compare the contour of the trim to the face of the gate. Even a slight mismatch can create gaps at the ends or uneven pressure across the panel. That can lead to rattles, poor alignment, or damage to fresh paint during installation.
It is also smart to inspect related components at the same time. Tailgate moldings, emblems, edge trim, attaching clips, screws, pads, and seals all affect the finished result. Installing fresh trim with tired or incorrect hardware is one of the fastest ways to end up with a part that never sits quite right.
If the tailgate has been repainted, pay close attention to hole size and paint buildup around the mounting area. Extra paint thickness can interfere with clip engagement or cause trim to sit proud of the panel. On a driver, that may be tolerable. On a detailed restoration, it will keep catching your eye every time you walk behind the truck.
Removing old tailgate trim without creating more work
Removal is where patience saves money. Old trim often comes off harder than expected because of rusted hardware, hardened seals, hidden adhesive, or clips that have fused to the panel over time. Forcing it usually bends the trim or chips the paint around the mounting points.
Start by supporting the trim as you loosen fasteners from behind the panel if accessible. If clips are involved, work evenly from one side to the other rather than prying up one section and hoping the rest follows. On older El Caminos, brittle retainers can break apart as soon as tension is applied, which is another reason replacement hardware should be part of the plan, not an afterthought.
Once the trim is off, clean the mounting surface completely. Remove old adhesive residue, dirt, oxidation, and any rust starting around the holes. This is also the time to inspect for stretched holes or signs of previous body filler. New trim will only fit as well as the surface beneath it allows.
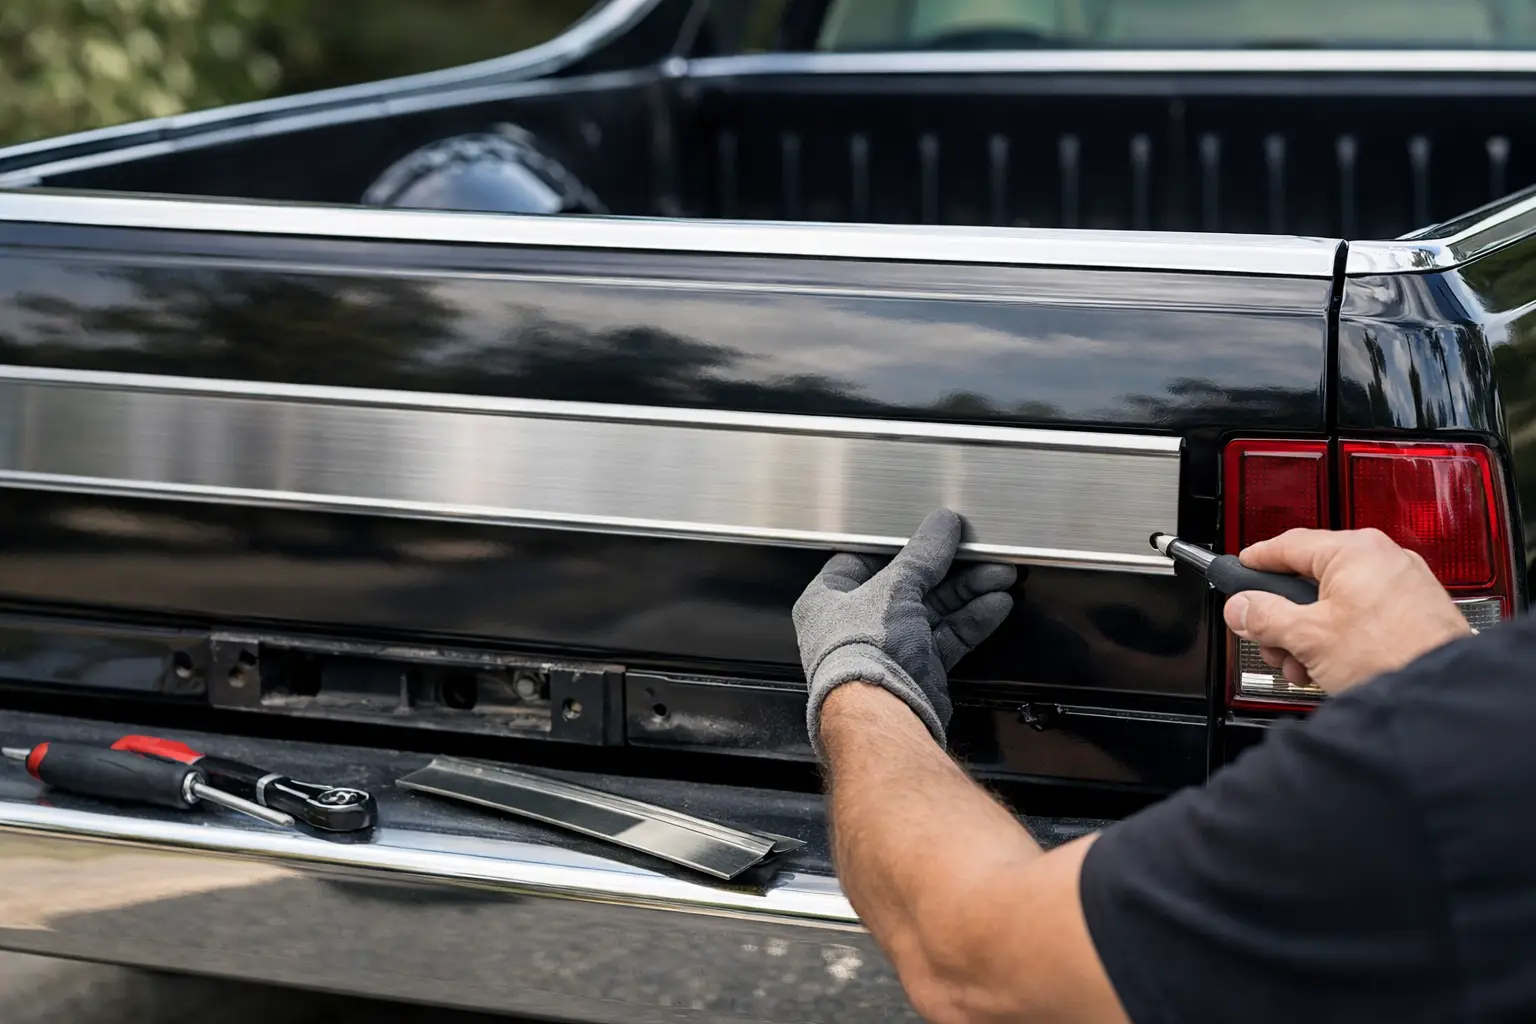
Getting the new trim to fit and stay put
A good installation starts before the part ever touches the paint. Test-fit the trim first. Hold it in place, line up the ends, check body contour, and make sure every attachment point corresponds with the tailgate. If something looks off, stop there. It is better to recheck the application than to force a part into alignment and damage it.
Use the correct hardware whenever possible. Original-style clips, screws, and retainers are not small details in this job. They determine how evenly the trim loads against the panel and whether it stays secure over time. Generic hardware can work in some cases, but it often changes spacing or tension just enough to create vibration, distortion, or visible gaps.
Protecting the paint is just as important. Freshly restored tailgates are especially vulnerable around edges and mounting holes. A careful installer will mask adjacent painted areas during test fitting and final placement, then remove protection once the trim is seated and aligned.
Do not over-tighten. Trim pieces can deform under too much pressure, especially reproduction parts or older originals that have already been polished several times. Tight enough to secure the piece is the goal. More than that can leave you with a ripple or stress mark that was not there when you started.
Why hardware and supporting parts matter
A tailgate trim piece rarely fails on its own. More often, it gets loose because clips lose tension, screws corrode, backing pads disappear, or moisture gets trapped behind the molding. That is why experienced restorers replace the hardware set at the same time whenever possible.
This approach costs a little more upfront, but it usually saves time and frustration. Fresh hardware helps the trim sit flatter, reduces the chance of rattles, and protects the finish from uneven contact. It also gives you more confidence that you will not be pulling the piece back off after the first drive or wash.
For owners restoring 1964-72 GM A-body vehicles, buying from a specialist such as Classic Parts can make that process easier because the supporting pieces are often just as important as the trim itself. Getting the right clips, fasteners, and related components from one place cuts down on guesswork and helps keep the project moving.
Factory-correct look versus driver-quality finish
Not every El Camino needs concours-level detail. Some owners want exact grain, profile, and finish to match a high-end restoration. Others simply want a straight, clean, dependable tailgate that looks right from ten feet away and holds up on the road.
There is no wrong answer, but it helps to be honest about the build. If the vehicle is a weekend driver with upgraded paint and non-stock wheels, a well-made reproduction trim piece may be the best value. If the rest of the vehicle is restored to factory specs, mismatched tailgate trim will stand out more, and investing in a more original-correct part makes better sense.
The key is consistency. Tailgate trim should match the standard of the rest of the vehicle, not fight against it.
A clean rear finish says a lot about the quality of an El Camino restoration. When the trim fits right, the hardware is correct, and the panel lines stay true, the tailgate looks finished the way GM intended. Take your time, verify the details, and treat the small parts like they matter – because on these classics, they always do.