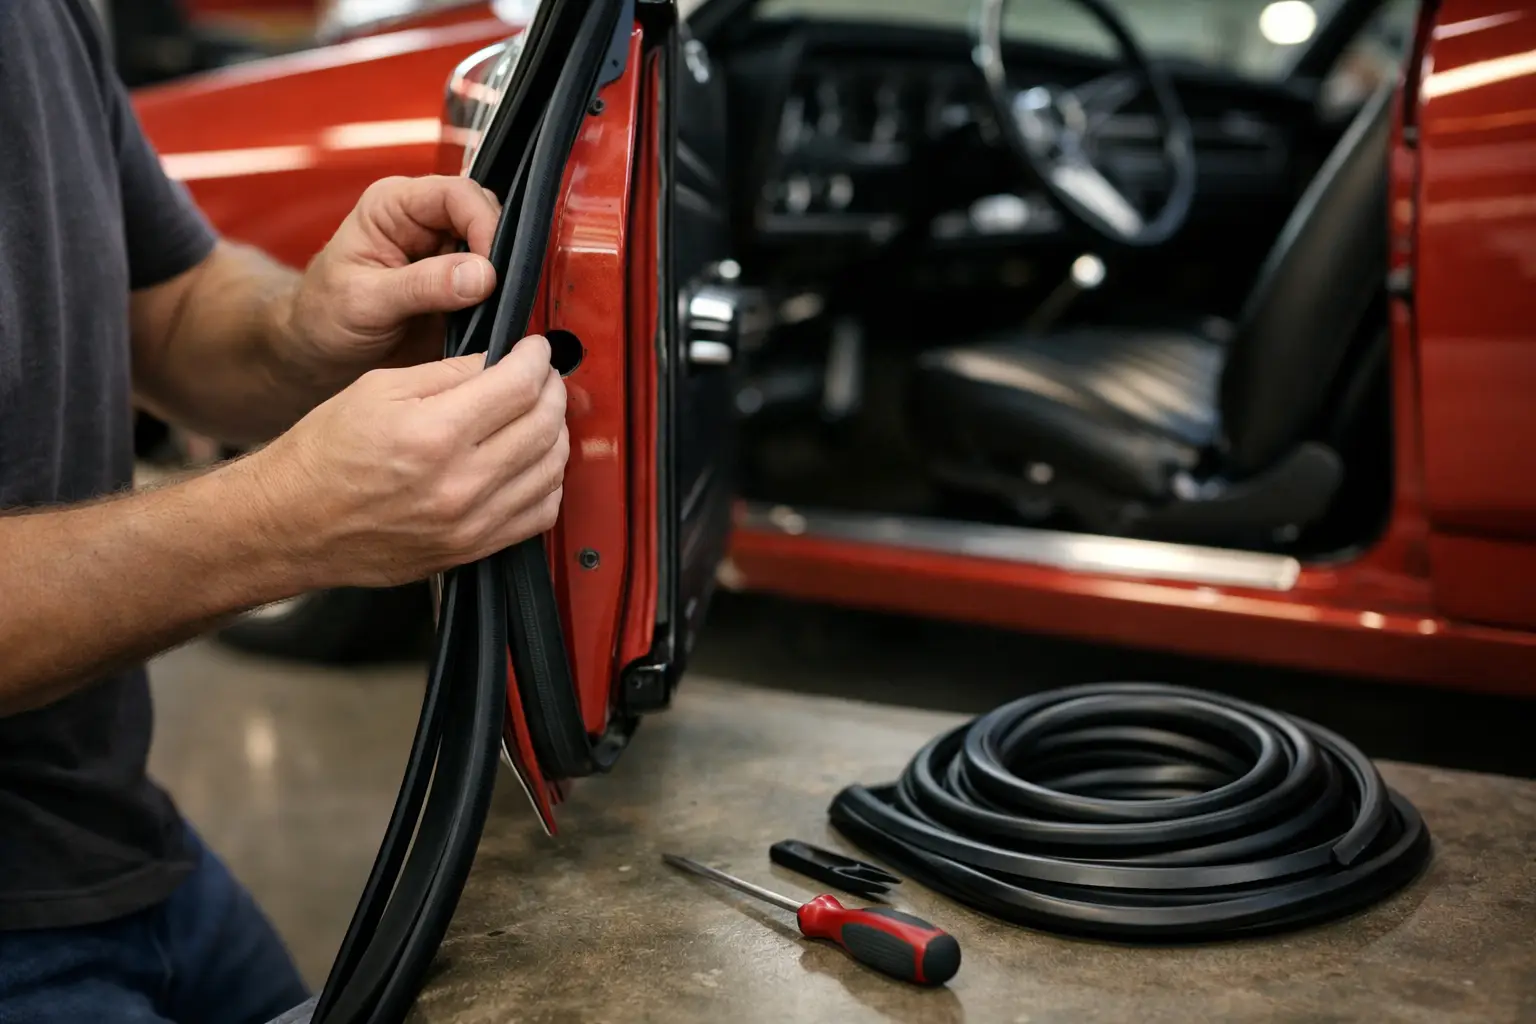
A Chevelle door that suddenly needs a hard slam usually is not a hinge problem – it is often fresh weatherstrip that is too thick, glued in the wrong spot, or installed before the old channel was fully cleaned. If you are figuring out how to replace Chevelle door seals, getting the fit right matters just as much as getting the new rubber in place.
On 1964-72 Chevelle, Malibu, and El Camino models, door seals do more than keep rain out. They cut wind noise, help the door close with the right feel, and protect interior panels, carpet, and lower door structure from moisture. A poor seal can leave gaps at the top rear corner, create drag along the latch side, or make a freshly painted car frustrating to live with. The good news is that replacing them is a very manageable job if you take your time and pay attention to alignment.
What to check before you replace Chevelle door seals
Before pulling anything apart, confirm the old weatherstrip is really the problem. Torn rubber, flattened sections, water intrusion, visible cracks, and excessive wind noise all point to worn seals. If the door is already sagging, though, new rubber will not fix that. Worn hinges or striker misalignment can mimic weatherstrip issues, and installing thicker new seals on a misaligned door usually makes the closing problem worse.
It also helps to compare what is currently on the car to the correct seal for the body style and year range. Hardtop, sedan, wagon, and El Camino applications can differ, and convertible weatherstrip details matter even more because the glass and top have to meet the seal correctly. Factory-style fit is worth paying for here. Generic or poorly molded seals can force you to chase fitment problems that are not really installation mistakes.
Tools and materials you will want nearby
This is not a complicated tool job, but it is a prep-heavy one. Most restorers can handle it with a plastic scraper, adhesive remover safe for painted surfaces, clean rags, weatherstrip adhesive, masking tape, and a small brush or nozzle for controlled glue application. A trim tool helps with stubborn sections, and a marker can be useful if you want to note starting points before removal.
If your car still has old glue built up in the pinch weld channel, plan extra time. That cleaning step is what separates a clean install from a seal that twists, sits proud, or peels loose after a hot summer.
Removing the old seal without creating new problems
Start at a loose end and gently pull the old weatherstrip away from the door opening. Some sections may come off easily while others stay bonded hard to the flange. Do not rush it. Pulling too aggressively can tear old adhesive loose along with paint, especially on older restorations.
Use a plastic scraper and adhesive remover to lift the remaining glue. The goal is a smooth, clean mounting surface all the way around the opening. Any lumps left behind can hold the new seal away from the flange and create a gap. Pay extra attention to the corners and radius sections near the upper hinge area and roofline. Those are common trouble spots.
Once the old seal and glue are gone, wipe the area clean and let it fully dry. If you uncover rust, chipped paint, or bare metal, address that before installing the new weatherstrip. Seals are there to keep moisture out, not trap it against unfinished metal.
How to replace Chevelle door seals step by step
Before using adhesive, dry-fit the new seal. Lay it around the door opening and confirm the molded corners sit where they should. Do not stretch the rubber to make it fit. Weatherstrip that is stretched during installation tends to shrink back later, and that can pull corners away or create a short section near the end.
Most quality Chevelle door seals will have a natural orientation based on the molded profile. Make sure the bulb portion faces the correct direction so it compresses against the door properly. If you install it rotated or flipped, the door may not seal even if everything looks close at first glance.
Apply weatherstrip adhesive in short sections rather than coating the entire opening at once. A controlled approach gives you time to place the seal accurately and keep glue off the paint. Many installers like to start at the lower rear area and work upward, pressing the seal firmly onto the flange as they go. Others prefer beginning at a molded corner. Either method works as long as the seal sits naturally and is not being forced into position.
As you move around the opening, press each section in evenly and check that the base is fully seated. Corners deserve patience. If the seal bunches in a corner, lift it before the adhesive sets and reset it. If you simply press through the wrinkle, it will likely remain visible and may affect door fit.
Masking tape can help hold problem areas in place while the adhesive cures. This is especially useful on vertical sections or tighter curves where the rubber wants to pull away slightly. Keep checking the seal profile as you go. A twisted section can be easy to miss until the door closes against it.
When you reach the end, the seal should meet cleanly without being compressed into place. If it seems too long, do not trim first and ask questions later. Recheck the entire perimeter to make sure the rubber is fully seated and not bunched somewhere. Many times the extra length is caused by one small area not being pressed completely home.
The first door-close test matters
Once the adhesive has had time to tack, close the door carefully. Do not slam it right away. A new seal will usually feel firmer than an old flattened one, but the door should still latch without extreme force. If it takes a hard push, inspect where the weatherstrip is contacting most heavily.
A common issue is too much adhesive or incorrect placement along the latch side, which can stack the seal outward and make the door fight you. Another is a corner that is not tucked correctly near the top rear of the opening. If the seal is seated right, some resistance at first is normal. New rubber often needs a short break-in period to take a set.
This is where many restorers start adjusting the striker too quickly. Be careful. If the door aligned well before and only became tight after weatherstrip installation, the seal is usually the first thing to verify. Moving the striker too far to compensate can create uneven panel fit or a door that looks flush but still leaks air.
Common fitment problems and what causes them
If the top rear corner leaks, check for a twisted seal, a stretched installation, or a door glass adjustment issue. On hardtops and convertibles especially, weatherstrip and glass alignment work together. New seals can expose a window adjustment problem that old worn rubber had been masking.
If the door stands proud after latching, the seal may be too bulky in one area or not fully seated on the flange. Sometimes reproduction weatherstrip needs a little time to relax, but it should still follow the opening cleanly. If one section looks obviously overstuffed, revisit that area before assuming it just needs break-in.
If adhesive keeps letting go, the mounting surface likely still has old residue, wax, or cleaner on it. Weatherstrip adhesive needs a properly prepared surface. Temperature can also affect bonding. Trying to install seals in a cold garage with stiff rubber and slow-curing adhesive makes the whole job harder than it needs to be.
A few model-specific realities
Not every A-body door opening behaves exactly the same. A driver-quality car with years of prior body work may not accept seals exactly like a low-mile original car. Replaced quarter panels, repaired jambs, hinge wear, and glass adjustments all affect final fit. That is why factory-style parts and patient installation matter.
Convertibles deserve extra caution because the relationship between the top, side glass, and weatherstrip is more sensitive. El Camino owners also need to pay attention to body-style-specific seal profiles rather than assuming all Chevelle family parts are interchangeable. Correct fitment saves time, adhesive, and frustration.
For that reason, many restorers buy from specialists who know 1964-72 GM A-body applications inside and out. Classic Parts has built its reputation around exactly that kind of platform-specific support, which can make a difference when you are trying to get the right seal the first time.
Give the seal time to settle
After installation, let the adhesive cure fully before regular use. Keep the door closed when practical so the new rubber can begin conforming to the body. Over the next several days, the closing effort should improve slightly as the seal takes a set. If it does not, revisit alignment and contact points rather than forcing the latch to compensate.
A properly installed door seal should make the car feel tighter, quieter, and more finished every time you close the door. That is one of those small restoration details that pays you back on every drive, especially when the part fits like it belongs there.